Highway Work Zones & Traffic Control
Road workers face danger from passing traffic and from their own equipment inside the work zone. A good traffic control plan separates workers from vehicles.
- Construction
- Utilities
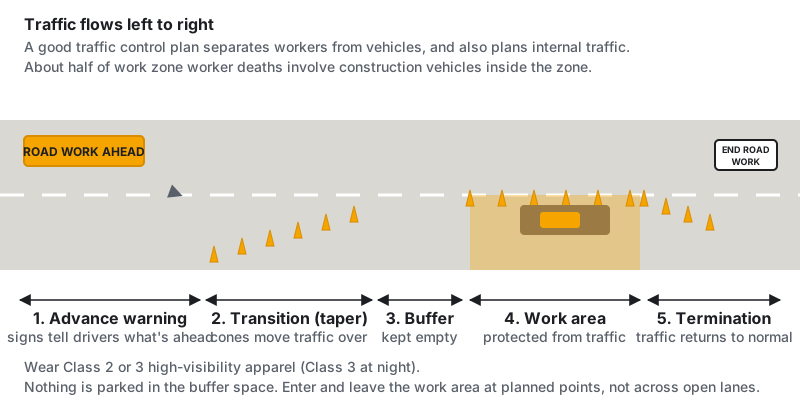
Traffic control basics
- Work zones follow the federal Manual on Uniform Traffic Control Devices (MUTCD) Part 6 and state DOT rules.
- Signs, cones, drums and barriers must be set up per the traffic control plan before work starts, and removed when done.
- Use positive protection (concrete barriers, truck-mounted attenuators) where speeds are high and workers are close to traffic.
- Plan internal traffic: where equipment travels, backs up and enters or leaves the work zone.
The parts of a work zone
| Area | What it does |
|---|---|
| Advance warning area | Signs tell drivers what’s ahead (“Road Work Ahead,” “Right Lane Closed”) so they can slow down and merge. |
| Transition area (taper) | Cones or drums move traffic out of its normal path. Taper length depends on speed and lane width. |
| Buffer space | An empty space between the taper and the workers. No equipment, materials or vehicles are parked here. |
| Work area | Where the work happens, separated from traffic by channelizing devices or barriers. |
| Termination area | Lets traffic return to normal, with an “End Road Work” sign. |
Positive protection
Cones and drums guide drivers but won’t stop a vehicle. Where speeds are high or workers are close to traffic, use positive protection:
- Portable concrete or steel barriers
- Truck-mounted or trailer-mounted attenuators (TMAs) on shadow vehicles behind the crew
- Moveable barrier systems on long projects
- Full road closures and detours when possible
High-visibility apparel
Everyone working in the right-of-way of a federal-aid highway must wear high-visibility safety apparel meeting ANSI/ISEA 107 Class 2 or 3. Class 3 is recommended for high speeds, flaggers and night work. See High-Visibility Clothing.
Flaggers
- Trained (many states require flagger certification)
- Class 2 or 3 high-visibility apparel; Class 3 and lighting at night
- STOP/SLOW paddle (at least 18 inches wide) rather than a flag when possible
- Stands on the shoulder, visible to traffic, never in the open lane
- Has an escape route and stays alert. No phones.
- Advance warning signs (“Flagger Ahead”) in place
Workers on foot
- Stay inside the protected work area.
- Never turn your back to traffic when you can avoid it.
- Watch for construction vehicles backing inside the zone.
- Enter and leave the work area at planned points, not by crossing open lanes.
- Don’t sit or rest on barriers, or stand between a vehicle and the barrier.
Inside the work zone
About half of work zone worker deaths are caused by construction vehicles and equipment inside the zone, not passing traffic. An internal traffic control plan lays out:
- Where trucks enter and exit the zone, and how they merge with traffic
- Travel paths for equipment, separate from where workers on foot are
- Where backing is allowed, and spotter rules
- Where materials and vehicles are staged (not in the buffer space)
- How the crew communicates (radios, signals)
See Backing & Spotters.
Night work
- Light the work area and flagger stations, but aim lights so they don’t blind drivers.
- Wear Class 3 apparel, and add lights to hard hats or vests where allowed.
- Expect more impaired and drowsy drivers at night. See Night Work & Lighting.
Video: setting up a lane closure with cones and signs
Standards & references
- 29 CFR 1926.200–.203: Signs, signals and barricades (adopts MUTCD Part 6)
- FHWA: MUTCD
- National Work Zone Safety Information Clearinghouse
Last updated: